Create new example#
👋 Everyone is welcomed to contribute with their own forward code. We aim to reduce the barrier of contributing so don’t worry if you are not familiar with some technical stuff - we are here to help.
Add your own Espresso problem#
A new contribution to Espresso has to conform to a consistent file structure. The simplest way to ensure that a new contribution includes all files is to start the creation of a new problem from the template. Run the following command from the the path to Espresso:
python espresso_machine/new_contribution/create_new_contrib.py <problem-name>
Replacing
problem-namewith your Espresso problem name in snake case (e.g.gravity_density,polynomial_regression). Remember to choose a sensible, unique name for your contribution that makes it easy to understand what the example is about.Navigate to folder
<path-to-espresso>/contrib/<problem-name>, and you’ll see template files needed for a new contribution. Each Espresso example is organised around a central class object that contains, at minimum, a set of functions with names that are shared by all examples.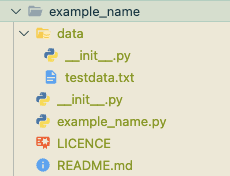
Now the folder is all yours, get started with the following checklist.
Checklist and tips
contrib/<problem-name>/README.mdDocument anything you’d like to add for this problem, such as the what the problem is about and some brief intro of the theory behind.
This will be automatically rendered into Test Problems Reference.
contrib/<problem-name>/LICENCEWe use a 2-clause BSD licence as the default one. Feel free to replace it with a licence that suits you best.
contrib/<problem-name>/<problem-name>.pyThe development will be centered around the autogenerated class
ProblemName. It is a subclass of EspressoProblem so you might find the API reference helpful.All standard attributes have been declared in the template but are left for you to implement. You’ll see that some are required (with
TODO) and others are optional.If you would like to load data from files, please use our utility functions to get the absolute path before calling your loading function.
Apart from the standard attributes, there are many more functions and values that a new contribution can contain, for examples:
inversion_suggestion: a string containing inversion suggestions
reg_param_suggestion: a sensible value for regularization parameter
dx: spatial resolution in x-direction
dt: temporal resolution
nt: number of time steps
The possibilities are endless! Whatever information you find helpful is probably also helpful for the users. Simply attach them to the problem class as additional attributes.
We aim to follow Python PEP8 style conventions to make source code readable. Though not strictly enforced, we recommend Black formatter and PyLint to maintain a good coding style.
pyproject.toml, in particular theINSTALL_REQUIRESvariable, if needed.
Test running your code.
Troubleshooting: issue with relative import
Note that you might see an error if you have any relative import in the main Python file:
# file: <problem-name>.py

from .lib import *
In this case, use
contribas your working directory and import your contribution in the following example way:$ pwd # check you are in the right folder <path-to-espresso>/contrib $ python >>> from example_name import ExampleName # ...and import this way
Or the following example if you are running a file:
# file: contrib/tmp.py                       # create tmp file in the right folder
from example_name import ExampleName         # ...and import this way
Validate your code with Espresso by running:
$ python espresso_machine/build_package/build.py --pre --post -c <example_name>
which includes the following steps:
Validate all required and standard attributes that you’ve implemented
Build your contribution into a temporary source code folder
_esp_buildInstall your local development Espresso version
Validate all required and standard attributes from the installed package
Check that packages needed to run your code are listed by Espresso
Read on the appendix sections in this page for how an Espresso example is validated and how Espresso is built, and continue with the Developer Guide further details the whole infrastructure (i.e. the
espresso_machine).
Jupyter Notebook#
Additionally, we encourage you to add a Jupyter Notebook with an identical name into the folder Jupyter Notebooks that contains the following:
An extensive description of the new Espresso Problem, containing information about (but not limited to):
the forward calculation (ie. the underlying physics) and how it was implemented.
which inversion method is used (and regularisation) and how it was implemented.
the physical unit of relevant variables, but at least of
modelanddata.all changeable parameters, possibly in a list.
An example of the new problem being used, with a reasonable output.
Appendix I: build steps#
Usage:
$ python build.py [--pre] [--post] [--no-install] [-c <example_name>] [--file <file_name>]
For instance, to install your development version locally, run the following in your terminal:
$ python espresso_machine/build_package/build.py
Run the following for detailed usage information:
$ python espresso_machine/build_package.build.py --help
The following table describes what happens when we package Espresso:
Step |
What’s done |
How it’s done |
|---|---|---|
1 |
Clean |
|
2 |
Move meta info files to |
|
3 |
Move |
|
4 |
Generate version file and write it to |
|
5 |
Move |
|
6 |
Move |
|
7 |
Change versioningit configs file |
|
8 |
Build capability matrix |
|
9 |
Install package from |
|
Appendix II: validation steps#
Usage:
$ python validate.py [-h] [--all] [--pre] [--post] [--contrib CONTRIBS] [--file <file_name>]
For instance, to test whether your new contribution aligns with the Espresso standard, run the following in your terminal:
$ python espresso_machine/build_package/validate.py -c <contrib-name>
Or the following for a complete check on all examples (including yours and existing ones for regression test), both before and after Espresso installed:
$ python espresso_machine/build_package/validate.py
Anyway, run the following for a detailed usage of this script:
$ python espresso_machine/build_package/validate.py --help
The following table describes what happens when we validate a certain version of Espresso:
Step |
What’s done |
How it’s done |
|---|---|---|
1 |
Check the contribution folder name matches the main Python file name ( |
|
2 |
Check |
|
3 |
Check the class name is listed in |
|
4 |
Check the contribution provides access to the required metadata |
Pull out the |
5 |
Check required methods / properties are implemented and a complete workflow can run for each example number |
Run from |
6 |
Check optional methods / properties, if implemented, have the correct type signatures |
For each example, check that the outputs of |
7 |
Check |
|